SerialChart Tutorial
This guide goes over how to set up Arduino for HCC computers, attach an IMU to the Arduino, and view data from the IMU on serialchart.
User Page: Kcarpent7117 Project Page: Quadcopter Project
Step 1: Gather Materials
editYou will need an arduino (I have tested the Mega 2650 and Uno models and both have worked), a breadboard, a 5DOF IMU such as this model used in the HCC engineering room. Pins will need to be soldered onto the IMU if they aren't already so it can be attached to the breadboard. 7 stiff wires, from 3"-4" long, will also be necessary to connect the breadboard to the ardunio.
Step 2: Connect the IMU to the Arduino
edit-
 All the materials you will need to wire the IMU to the Arduino.
 -
 Flip the IMU upside-down, pins up. Next to each pin will be a label which denotes its output/purpose. On the Arduino, we will be using one of the GND slots, a 3.3V slot, and Analog slots A0 through A4.
 -
 Take the breadboard and plug in the wires as shown. The color of the wires is irrelevant as long as you remember which wire is associated with which output from the IMU. For example, the green wire in this photo is associated with the ground, or 'GND', on the IMU.
 -
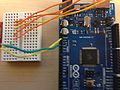 Now, you can start plugging in wires to the Arduino. 3.3V on the IMU goes into the 3.3V slot on the Arduino, and GND from the IMU goes into one of the GND slots on the Arduino.


From here, connect the rest of the wires using this guide:
| From the IMU | Analog In on Arduino |
|---|---|
| X-Acc | A0 |
| Y-Acc | A1 |
| Z-Acc | A2 |
| Y-Rate | A3 |
| X-Rate | A4 |
There should be nothing plugged into the slots for VRef or ST.
-
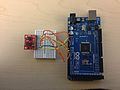
 The wiring should look something like this. Check to make sure all the connections are secure.
 -
 Take the IMU and flip it laterally, so the pins are now facing down. The front of the IMU will appear to be upside-down. Plug the IMU into the breadboard, with the first pin on top lining up with the first wire.
 -
 Use some force to push the pins of the IMU securely into place.
 -
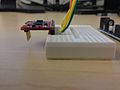
 This is the final product, ready to be plugged into the computer.


Step 3: Installing Arduino Drivers
editThis step applies to setting up Arduinos in the Howard Community College Engineering Lab. If you are using a different computer, you will need to download drivers for the Arduino from the Arduino website.
-
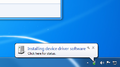 Plug the Arduino into the computer using a USB cable. You will see the computer attempt to recognize the device and fail.
 -
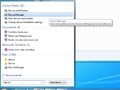 Click the 'Start' icon at the lower lefthand side of the screen. Type in 'device', and run the 'Device Manager' program that appears in the menu.
 -
 Once the device manager is open, there will be a menu expended for 'Other Devices' with the Arduino's model name underneath it. Right click the name and select 'Update Driver Software...'
 -
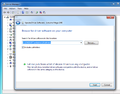 A window will open that asks you to find the location of the drivers. Fortunately, the drivers are already on the computer, and the address to the folder should automatically be filled in. Click Next.
 -
 The drivers should begin to install. A window will open complaining about how Windows cannot verify the publisher of the software. Click to continue installing the drivers anyway.
 -
 After installation is complete, the device manager should display the Arduino under the 'Ports' menu, with the USB port that it is plugged into beside the model name.


Step 4: Download and Extract Software
editYou will need SerialChart by Starlino and the Ardunio sketch and SerialChart file for this tutorial.
-
 After downloading both files, extract each of them by right clicking and going to 'Extract All...'
 -
 Two new folders will be created.


Step 5: Uploading the Program onto the Arduino
editTo open the software used to upload code to the Arduino on an HCC computer, open the 'EngShortCut' folder on the desktop and go to Arduino.
-
 After the program opens, click on 'Tools' in the menu bar and go to the 'Board' submenu. Select the model of your Arduino from the list. After that, go to the 'Tools' menu again, and this time go to the 'Ports' submenu. Select the USB port that the Arduino is plugged into, which you can find by looking at the device manager.
 -
 After both selections are made, you should see the model number and port on the bottom right side of the Arduino window.
 -
 Go to 'File' in the menu bar and go to 'Open...' Navigate to where the IMU software was extracted. Open this folder and select 'Imu_Arduino.pde.'
 -
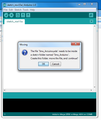 This dialog box will pop up. Hit 'Ok.'
 -
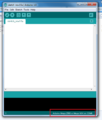
 The code for the Arduino, or the 'sketch,' will open in a new window. On this window, click on the 'Uplodad' button near the top left.
 -
 A progress bar should appear at the bottom of the window, and will read 'Done Uploading' with no errors in the black area if the upload was successful.


Step 5: View Data on Serial Chart
editOpen the SerialChart software by navigating to the folder that the .zip file was extracted to, and opening the file 'SerialChart.exe'
-
 After opening SerialChart, click on the open icon. Navigate to the folder that the IMU software was extracted to.
 -
 Select the 'imu_arduino.scc' file and open it.
 -
 Text will appear on the righthand side of the Serial Chart window. On the second line, it will have a line that says 'port=COM3'. Change COM3 to the port that the Arduino is plugged into.
 -
 For example, the port I plugged my Arduino into was COM6. The final code should look like this.


Click on the green play icon near the top left of the Serial Chart window. The program should be displaying data from the Arduino in the left and bottom frames of the window. Picking up the Arduino and rotating it in different directions will yield different results within SerialChart. Here's what the final product should look like.