MakerBot/Filament Changing/Troubleshooting
< MakerBot
Changing the Filament
editSetup
- 1. Log on to a computer near the MakerBot Cupcake CNC.

Logging onto a CL computer near the HCC MakerBot - 2. Open the “Engineering” folder on the desktop.

Opening the Engineering folder - 3. Click on the program called, “ReplicatorG.”

Opening Replicator G - 4. Plugin the power cord to the MakerBot and an outlet.
- 5. Plugin the serial cord to the MakerBot and the computer you are currently working on.
- 6. Turn on the MakerBot Cupcake CNC, the power switch is on the bottom left of the back side.
- For more assistance, view this video: Setting Up the MakerBot Cupcake CNC
- 7. Using the connect tool in the top Replicator G menu, connect ReplicatorG to the MakerBot. If the connection is not recognized in ReplicatorG you may need to select a different serial port or rescan for other serial ports. This can be done by going to the “Machine” drop down menu on the tool bar in ReplicatorG.

Selecting the connect tool 
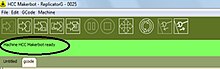
Selecting or scanning other serial ports - 8. “Machine HCC Makerbot ready” should appear in green at the top of the ReplicatorG screen. Also, more of the tools at the top of the ReplicatorG screen are available to use.
- If the box is not green, check the devices in the Control Panel for exclamation points. Unplug the Serial cord and plug it back in to check that the device is the MakerBot. If it has an exclamation mark, right click the device and go to properties > hardware > properties > Driver > Update driver > Browse my computer... > Type or Browse... C:Users\your_student_login_ID\desktop\engineering\replicatorg\drivers. If the device is still not working and it still has an exclamation point, reinstall the drivers again using the same process. If it does not work a second time, make sure that you typed the folder containing the drivers correctly by navigating to it through "My Computer" Libraries or the Browse button in the troubleshooting process.
Confirming the Replicator G - MakerBot connection is complete
- If the box is not green, check the devices in the Control Panel for exclamation points. Unplug the Serial cord and plug it back in to check that the device is the MakerBot. If it has an exclamation mark, right click the device and go to properties > hardware > properties > Driver > Update driver > Browse my computer... > Type or Browse... C:Users\your_student_login_ID\desktop\engineering\replicatorg\drivers. If the device is still not working and it still has an exclamation point, reinstall the drivers again using the same process. If it does not work a second time, make sure that you typed the folder containing the drivers correctly by navigating to it through "My Computer" Libraries or the Browse button in the troubleshooting process.
- 9. Click on the control panel tool in the ReplicatorG tool bar.

Opening the Control Panel Window - 10. In the “Control Panel” window, set the “Target Temperature (C)” to 180.0 and the "Platform Target Temperature (C)" to 110.0. This heats the wire to its appropriate melting temperature and heats the platform to cause the filament to stick to it better. This could take a few minutes.
- 11. Now wait for the motor’s current temperature to reach the target temperature.
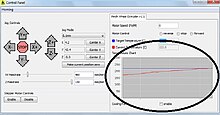
Recognizing that the current temperature has reached the target temperature - 12. Loosen the Thumbscrew. The screw is located on the right side of the motor.

Locating the screw - 13. Pull out the filament wire and slide the new material into the MakerBot Cupcake CNC motor. The motor is located in the center of the top side of the MakerBot.

Placing the black wire - 14. Tighten the Thumbscrew.


