Implement2
Problem Statement
edit- Figure out how many ohm resistor for voltmeter.
- Figure out the shunt resistor.
- How to parallel shunt resistor with voltmeter.
- Test the converted ammeter.
Lists, Source, Cost, Consumable
edit- One voltmeter, one 3amp power supply, one 0.3 ohm, one 1 ohm resistor, two 10k resistors, one bread board, three alligator jumpers, two wires.
- These sources are from School supply.
Designing the Implementation Process
editThe initial design
edit- Found this useful pdf file Conversion of voltmeter to ammeter
- Replaced 1M voltmeter's resistor with 1 ohm resistor.
- Tested the converted ammeter, the needle flip to another side of voltmeter.
- Because the voltmeter's resistor is too small, and the voltmeter is in series connection.
-
 Testing converted ammeter

- The current overloaded will cause meter broken.
Final Design
edit- Keep following this pdf file Conversion of voltmeter to ammeter
- Replace 1k resistor with 10k resistor.
- Connect 0.3ohm power resistor in parallel with 2 poles of voltmeter on the back.
-
 Converted ammeter

- Connect another 10k resistor in series with converted ammeter.
- Connect the alligator jumpers with 3amp power supply, then turn on.
Work flow
edit- solder 1k resistor off.
-
 solder off this resistor

- Solder 10k resistor on.
-
 1k resistor

- Make 2 wires.
-
 cut a piece of wire
 -
 pull 2 wires out
 -
 get 2 wires


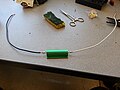
- Solder 2 wires with 0.3ohm power resistor.
-
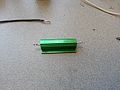 2 wires connect to 0.3 power resistor
 -
 2 wires connect to 0.3 power resistor
 -
 2 wires connect to 0.3 power resistor
 -
 2 wires connect to 0.3 power resistor


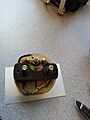
- Connect 0.3ohm power resistor to voltmeter.
-
convert voltmeter to ammeter
-
 convert voltmeter to ammeter

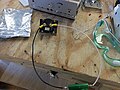
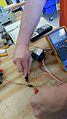
- Connect converted ammeter to the circuit.
-
 connect meter to the circuit.

- Here is my youtube video test converted ammeter
- Turn on the 3amp power supply.
Hardware/software function and safety
edit- The resistor may get burn up and melt when test a couple times.
- Keep alert. When smell something burning check around.
- This resistor get burn and melt.
-
 resistor get burn up

Test and analysis procedures (hardware vs. software, acceptance vs. qualification)
edit- Turn on the 3amp power supply. If the needle flip to the middle, the converted ammeter is working.
Poster
editNext Steps
edit- Get a new voltmeter.
- Follow the Work Flow.