How to install the Anaglyph script in GIMP step by step
Tutorial how to install the Anaglyph script in GIMP.
- Download and install the free GIMP software.
- Create a folder for your GIMP scipts, e.g. Documents/Gimp Scripts
- Download Anaglyph script and store it in the new folder.

Open gimp and follow these steps:


Learning Tasks
edit- (Photogrammetry) Explore the concept of Photogrammetry with multiple images of a single 3D object from different angles with two images for the left and right eye merged into a single anaglyph image. What are the differences and what to have both approaches in common?
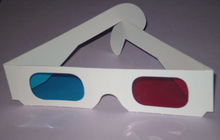
- (From Two Images to Anaglyph Image) Create two snapshots with your digital camera that are taken from two different positions with the eye distance. Move the camera horizontally with the distance of your eyes or take two actions cams mounted on a bar with the eye distance. Convert those images into grey scale for both eyes and then change the color of one eye into cyan or green (depending of the color of the glasses) and the other image for the second eye into red. Keep in mind that you need to convert the image with for the red lense of your red-cyan glasses into cyan and the image for the cyan/green lense into red, because the red color is hidden in the red lense and the cyan images are hidden in the cyan lense.
- (3D Modelling) Explore 3D modelling with anaglyph images and explain how you can create 3D image by merging two images (red and green/cyan) in an image processing software (use e.g. TWO snapshots of the same object (move 4cm/1.5in to right - avoid up/down movement). Use GIMP with add a new script-fu folder e.g.
Documents/GimpScripts. Store the anaglyph script fromscript-fu-make-anaglyph.scm[1]. ).
See also
editReferences
edit- ↑ Anaglyph Plugin - Fu-scripts (2021) - https://github.com/karlhof26/gimp-scheme/blob/master/make-3d-anaglyph.scm (accessed 2021/11/02)