Engineering Projects/Robot Hallway Navigation/Design
Problem Statement
editDesign and implement control software that enables an existing a LEGO Mindstorms robot to autonomously navigate the hallways of Howard Community College's CL building.
-
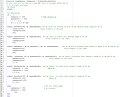
 Hallway dimensions

The Design Process
editRequirements for each element or component derived from system level goals and requirements
editAs long as the following requirements are fulfilled, the design of the software is left to the programmers:
- Robot's physical design cannot be changed;
- Sensors may be added to the Robot to help Robot make its journey around the hallway without running into obstacles.
- Use Matlab and Simulink to design and code the Robot's actions;
- The Robot should be able to avoid obstacles.
- The Robot must eventually be able to travel all the way around the hallway(the given course of travel).
Alternatives in design
editThere are several ways for the robot to navigate along the hallway:
- We could use a compass to follow a bearing of the hallway for a certain distance(measured by the amount of rotations of the wheels times the circumference formula). When the Robot went a certain distance, we could change the bearing of the compass sensor to have it go down another hallway and repeat this for each hallway.
- Mapping the dimensions of the hallway into a code that the robot will use.
- Use a servo motor attached to an Ultrasonic Sensor so the servo motor will turn the ultrasonic sensor, and the robot can make a decision of where to go based on the readings it receives.
- Use two ultrasonic sensors: one left to follow the interior wall, one in front.
The initial design
edit-
 Initial Design
 -
 TheFirst Robot Code.
 -
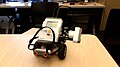 The front view of first prototype of NXT Mobile Robot Project
 -
 The front view of first prototype of NXT Mobile Robot Project


In this model, an ultrasonic sensor has been placed on the very front of the Robot looking forward, and an Ultrasonic sensor has been placed on the left side of the Robot looking to the left. The purpose of this design is for the robot to follow the inside wall of the CL hallways all the way around. While doing this, it should avoid obstacles to the left and in front of the Robot. However, when one of the sensors read a distance that does not trigger a turn (such the corner space between a pillar and a wall), it moves into the corner and gets stuck. This problem is noticed in the given video. (insert video here).
The main problem with this design is that it the Robot gets itself into a corner before the sensors detect that it is there, and the robot does not have enough time to turn around the the obstacle, so it gets stuck.
The use of two ultrasonic sensors is favored for its simplicity and its feasibility:
- The robot understands distance in terms of wheels' rotation. Since the robot is not moving straight, it is difficult to map the dimensions of the hallway.
- The compass is not really needed, especially with the robot not moving along a straight line.
- Implemeting the Servo motor will be a good feature if the hallway was not the required way but instead any way.
Experimental prototypes and testing conducted during design
editRobot Design Two
-
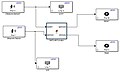 The Simulink Format of the second code.
 -
 The second robot code.


For this second Robot design, the same physical Robot design was kept, but the coding was slightly changed. It will still slightly go left on default, and if there is something detected on the left Ultrasonic sensor, it will still go slightly to the right. However, when the front Ultrasonic sensor detects something within its programmed distance, the Robot will turn faster to the right to help it get around obstacles better.
Unfortunately, the second design ends up having the same problem as the initial design. It still has the chance of getting stuck in a tight corner, and it has no way of getting out without running into the side of the corner and getting stuck.
Robot Design Three
-
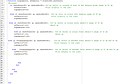 The third robot code.
 -
 The Left Ultrasonic Sensor is on the right side.
 -
 The Left Ultrasonic Sensor is on the right side and on a pivot for convenience.


For the third Robot design, the actual Robot's design was slightly changed. One of the problems the previous design had was that the left Ultrasonic sensor would sometimes get caught on obstacles and this would turn the whole Robot around. The way this was solved was by moving the left Ultrasonic sensor onto the right side of the robot. This Ultrasonic sensor will still look to the left, but it will not be the cause of the Robot getting stuck. As shown in the picture above, the sensor covers the buttons of the Robot's programmable brick. This is not a problem because the sensor is on a pivot, so if we need to access a program, all we have to do is pivot the sensor out of the way and then pivot it back to the starting position when the Robot is ready to go.
The code of the Robot for this design was also altered slightly. In this design, we added a backing up function that will activate if the Robot gets to close to an object in front of it. This program worked almost all the way around the hallway. Unfortunately, when the Robot got to the part of the hallway with benches, the legs of the benches confused the Robot and it ended up getting tangled in the benches. The Robot would see the leg and back up, but when the Robot backed up, the angle that Robot was looking did not include the leg in its vision, so moved forward again and after a couple time of doing this, it ran into the leg and got stuck.
Robot Design Four
-
 The Simulink Format of the fourth code.
 -
 The fourth robot code.


The fourth Robot design had the same physical design, but had a whole new format for the code that tried to incorporate a timer into the backing up function. What it was supposed to do was back up for a certain amount of time if it saw an object close in front of the Robot. This code did not work at all the way we wanted it to and we are not quite sure why. When we tested it, the Robot would just go in circles. This code used many constant variables that kept changing with world variables and it was over complicated for the purposes that we had planned for it. With several tests and several modifications with little success, we decided to revert back to the previous format of code and try to add the timer to that code.
Robot Design Five
-
 The Simulink format of the Fifth Draft.
 -
 The Fifth Draft of coding for the mobile Robot.


The fifth Robot design kept the same physical design, but the code was a much cleaner way to write it than the fourth designs code. It keeps the idea that the Robot should back up if an object is to close to the front of it. The problem with this code is that when activated, it just goes backwards and it never takes the other functions into consideration. This happens because the code turns the back up function on by increasing our global variable A, but none of the other functions turn this variable back to 0(the value required for the Robot to not back up). This function is close to what we want it to be, we just need to find a medium for which the Robot will use all of the functions when they are supposed to be used.
Appropriate optimization in the presence of constraints
editIn order to determine the conditions that will make the robot turn using the ultrasonic sensors, different ranges were tested:
- To turn sharply to the right when an obstacle is within 80 cm from the front sensor, a speed of 100 for the left motor and a speed of 35 for the right motor is used. When the speed of the right motor was 50 or 40, the robot was not able to turn sharply enough to get around an obstacle, so it would get stuck.
- For the backing up function, a 30 cm distance in front a front sensor was used because a distance of 10 cm or 20 cm did not give the turning function enough space for the robot to maneuver around the obstacle. The robot would turn into a corner at weird angle and be stuck.
- 80 cm is the left Ultrasonic sensor's maximum distance for it to sense an object on the left side and make the robot turn slightly to the right. This value was chosen because the pillars that are all along the walls protrude about 60 cm from the wall. 80 cm gives the robot plenty of space to go around the pillars. 80 cm is also roughly the middle of the hallway. When increasing this distance, the robot's path is much to parabolic and has a chance to just move in large circles in the middle of the hallway.
- The timer that was added is programmed to have the robot back up for 1 second if it gets to close to an object in front of it. The value of 1 second was chosen because any value greater than that causes the robot to back up for a pointlessly long interval. If the value was smaller, the robot might not have enough space to allow the sharp turning maneuver around the obstacle.
Iteration until convergence
editUp to design four, the codes above do not have a proper syntax and the logic might be difficult to pass to the Operate team. A flow chart was drawn and the code rewritten accordingly (See below). The timed back-up feature was also optimized.
The final design
edit-
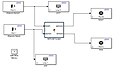
The Simulink format for the Final Draft.
-
 The Final Draft of coding for the mobile Robot.
 -
 This is the basic format of how the Robot works.
 -
The Left Ultrasonic Sensor is on the right side.
-
The Left Ultrasonic Sensor is on the right side and on a pivot for convenience.


The final physical design of the Robot uses the same design used in design three. The Front Ultrasonic sensor is on the lower front of the robot to detect any obstacles in front of the Robot. It is placed close to ground to make the Robot more concise and so it might detect smaller obstacles in front of the Robot. The Left Ultrasonic sensor is on the right side of the robot and it points to the left. This is used so the Robot can follow the inside wall all the way around the CL building's hallway. It was placed on the right side of the Robot so it would not get caught on obstacles when try to go around them. With the left Ultrasonic sensor on the right side it is both concise and convenient. If a program needs to be accessed on the Robot's programmable brick, the left Ultrasonic sensor can be pivoted out of the way and then pivoted back when the Robot is ready to run.
The code of the Robot is programmed with a default of moving slightly to left. If the left Ultrasonic sensor detects an object less than 80 cm away, the Robot will turn slightly to the right. If there is an object less than 30 cm away from the front Ultrasonic sensor, the Robot will back up for 1 second. If there is object greater than 30 cm away from the front Ultrasonic sensor but less than 80 cm away, the Robot will turn sharply to the right. The way it is programmed, the front Ultrasonic sensor functions always take precedence over the left Ultrasonic sensor functions. This code works together to drive the Robot all the way around the hallway.
Utilization of Knowledge in Design
editTechnical and scientific knowledge
edit- The majority of this project was using Matlab and Simulink to write the Robot's code. We had no idea of how Matlab and Sumulink worked, so we were taught the basics by Professor Edelen to help us get started. Although we did not know how to use Matlab and Simulink, prior knowledge of Java and C++ was very helpful for writing algorithms and programs for the Robot.
- We had to research on how NXT Lego robots worked and how they were compatible with Matlab and Simulink.
- Since this project was completely new to us, we had to look up on how to use ultrasonic sensors and how they were supposed to work.
Creativity, problem solving, and group decision-making
editThe main problems were to figured out a way to make the Robot turn a corner in the hallway and a way to make the Robot avoid obstacles. Using different scenarios, reviewing metrics, and considering the sensors used by the robot, the idea of always going left was adopted, along with using two ultrasonic sensors. We decided to do this because it was a simple way to make the Robot follow the inner wall all the way around the hallway. It was decided to use two ultrasonic sensors because one could make the Robot stay a distance away from the inner wall, and the other could keep the Robot from running into obstacles. Several positions were tested to find the best locations for the ultrasonic sensors. We decided to put the front ultrasonic sensor in the front and low to the ground so it would be closer to sensing obstacles and it could see smaller obstacles that were closer to the ground. We put the left ultrasonic sensor on the right so it would not get caught on obstacles when the Robot was going around obstacles.
Another problem was the issue of having the Robot back up in a timely and efficient manner. The robot was turning sharply and come face-to-face with an obstacle. When this happened backing up was not enough because the program was not written properly, so the Robot would only back up when it saw the object for the entire range that the front ultrasonic sensor planned it for. The most important decision was going back to the beginning to resolve this impasse. The logic was redrawn and the code was rewritten to match it.
Prior work in the field, standardization and reuse of designs (including reverse engineering and redesign)
editIn order to design the software, a week of preparations was used. It was for:
- Understanding how a lego robot works ( ultrasonic sensor, compass sensor, how to make the robot turn and metrics used);
- Finding how to use matlab and Simulink to design a logic (reverse engineering);
Modeling and/or Simulation
editSee above for Simulink models and a flow chart for different models of software and sensors' location.
Multi-Objective Design (DFX)
editPerformance, life cycle cost and value
editThe performance will be based on how well the code is written. Aside of the life cycle of product and battery, it should not require additional cost to drive the robot along the hallway or to run the software (as long as the same version of matlab is used).
Aesthetics and human factors
editAesthetics were not important but an effort was made to not alter the physical appearance of the robot in a ridiculous manner. However, the changes made regarding the position of the left sensor brought a minor challenge. The pivot must be used to start the robot and put back into place right after.
Also, a corrosion was found at the far right battery slot. Batteries should be taken out if the robot will not be used for a long period of time.
Finally, documentation is very important for continuity.
Implementation, verification, test and environmental sustainability
editA test of our final design was made and it worked. The robot is backing up at the beginning for a reason not yet determined but it drives along the hallway which proves that it is a viable design and the implementation will require some adjustments. Environmental sustainability was not a concern.
Maintainability, reliability, and safety
editThe software requires no maintenance and is only reliable along the path the robot has been assigned to drive along. From our last test, it seems that the robot is following any moving obstacle as well. Safety is not a concern but in order to prevent damages on it, the left ultrasonic sensor was mounted to the right (it still points to the left).
Robustness, evolution, product improvement and retirement
editThere is no plan for product improvement. The software is designed with the idea of using only the ultrasonic sensors. Unless their range improves and they are replaced, the logic can stay the same.