Engineering Projects/Illuminate Clothing/Howard Community College/fall2012/p2-504-krfb
Electronic Sections Expected edit
Problem Statement edit
We will use the engineering process to create masks that incorporate EL wire, creating an illuminated effect.
Team Members edit
Summary edit
Put an overall, short one paragraph summary here.
Poster edit

Story edit

For the first week the team discussed their different ideas of how to incorporate the EL wire. We are going to incorporate EL wire into personalized mask, and with the use of an arduino, we are planning to connect the output into a Microphone so when you are exposed to sound the EL wire will start glowing. Each group member decided on which type of mask they were going to use, and which color of EL wire we were using. So far the designs are, Phoenix, Molten Lava, and a Beard guy. We also unbraided the EL Wire that was braided by the previous group, because we will use it in a different way.


These are the mask designs that we came up with.
-
 The basic design for the God mask.
 -
 The wiring will involve LEDs as well as EL wire.
 -
 The LEDs will be hidden behind a piece of paper with holes punched in it, creating the starry effect.


-
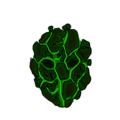 The basic design for the Lava mask.
 -
 There will plenty of saudering involved with making this mask since the EL wire doesn't bend sharp corners well.
 -
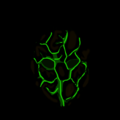 Only the cracks in the lava will be glowing for an eerie effect.


-
 The basic design for the Phoenix mask.
 -
 As with the lava mask, there'll be a ton of splicing.
 -
 The EL wire will trace the outside of the mask and the flares around the eyes.


Working on Masks first week edit
-
 Putting the plaster strips
 -

-

-
-


-
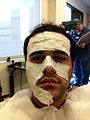
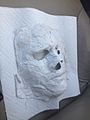
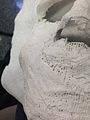
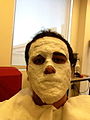 Complete face with plaster strips
 -
 Becca
Becca -
-
-


Working on Masks second week edit
-
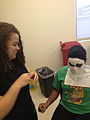
 Setting up Becca's mask
 -
 Becca's beak
 -
 Using Hot Glue
 -
 Assembling all together
 -
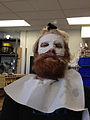
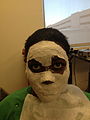
 New Mask
 -
 Side view of mask
 -
 View of mask


-
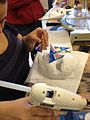
 Adding the EL Wire
 -
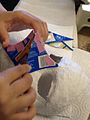
 Adding the LEDs
 -
 Making holes for LEDs
 -
 Threading the EL wire
 -
 Mask with EL wire and LEDs
 -
 Mask with EL wire and LEDs


Soldering the El-Wire edit
-
 The wire before saudering it.
 -
 Use wire cutters to snip off the messed up end of the wire.
 -
 Use 14 AWG wire strippers to remove the colored PVC tubing.
 -
 If done correctly, you should see a clear PVC tube with wires inside.
 -
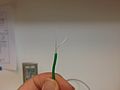 Use 22 AWG wires to remove the inner plastic coating. Be very careful! There are very fine wires underneath that break easily.
 -
 After the phosphor coating is off of the central copper wire, bend the fine wires back and sauder the copper wires together. Cover with tape, then sauder the fine wires together.


Decision List edit
None
Material List edit
- Plaster Strips (8) 5.00 $ each
- Vaseline (2) 2.25 $ each
- EL Wire (blue, orange, green, white, pink and red) (21 $ bought on Amazon)
- Putty $8 for a 1 quart tub
Software List edit
You installed different software packages or used already installed software. Describ the programs here.
Time edit
26
Tutorials edit
Plaster Mask Base Tutorial edit
Outlines our process for making the base of the plaster masks.
Next Steps edit
The next group will need to either finish creating the masks we begun, or work on creating new masks that will fit their own faces. They will also need to figure out how to securely hold a battery pack for the el-wire and the arduino.
Working with EL-Wire edit
- El-wire runs on AC current; this means that you will need either a transformer or a compatible arduino shield to have it communicate with an ardunio. There is an incredibly useful tutorial on how to use the shield with the arduino right on the sparkfun website.
- It is much easier to use a single strand of El-wire and mask off parts that you don't want displayed rather than saudering small lengths of it together. This is because the wire itself is difficult to strip properly.
- The wire gets its color from the outer PVC tubing. What creates the light itself is a phosphor coating around a central, positively charged wire. The difficulty in preparing this wire for saudering is separating a small, negatively charged wire wrapped around the phosphor coating from a clear PVC tube that encases it. You must use wire strippers no smaller than 22 AWG to strip off the clear coating without snipping the smaller wires.
Finishing Plaster Masks edit
Although we were able to begin making the masks, our group was not able to finish them in time for the end of the semester. Here are some steps a new group can take to finishing masks off.
- After you have the plaster base for the mask using this tutorial, map out where you would like to have the el-wire before doing anything else. Feel free to draw directly on the plaster.
- Cover the masks in a layer of wood putty about 1/4" thick. Don't be to concerned about making it completely smooth at this point, and put on more putty than you think you need. It may be easier to add a thin layer of putty on, let it dry, add another, and repeat.
- After the putty is completely dry, use sandpaper to smooth out rough areas and shape details in the mask. Start with a low-grit sandpaper to eliminate larger defects, and move to higher and higher grit to refine the surface. I would be cautious about using a dremel tool on the mask, since it may jeopardize the underlying structure of the mask. Don't forget to sand around holes for LED wires and El-wires.
- Use a small piece of sandpaper to create 'ruts' for the el-wire in the wood mask.
- Paint a coat of primer on the wood mask. After that's dry, use acrylic paint on the outside of the mask. Keep in mind the color painted underneath the el-wire will be illuminated.
- From here, carefully attach the el-wire using epoxy, or glue that won't melt when heated. Try to make sure that it isn't touching the acrylic paint underneath.
- Use a coat of heat-resistant lacquer over the entire mask to help preserve it and give it a nice finish.